So two days ago I made a scrumptious supper which got ravenous reviews from my husband! (And yes, he WILL tell me if he doesn't like it...he is very outspoken like that.) And the kids liked it too :)
I just realized that I didn't take any pictures though, shucks! Here is the menu plan:
"Even good cold" Meatballs
Chateau Potatoes
Cucumbers & cream
Mint Patties
Meatballs:
2 lbs ground beef
1 cup quick oats
1 cup milk
3 T very finely diced onion
1-1/2 t salt
few dashes of black pepper
1/2 c flour
oil for frying
Sauce:
1 cup ketchup
2 T sugar (or brown sugar)
2 T Bragg's liquid aminos (soy sauce)
few shakes of dried minced onion
In bowl combine first 6 ingredients for meatballs. Roll into golf ball size balls. Preheat oven to 350. Heat oil in pan. Roll meatballs in flour and lightly brown meatballs in pan on both sides. As they brown, place them in baking dish. (mine filled a 7-1/2x11 pan and an 8x8 pan.)
Mix together sauce ingredients and pour evenly over meatballs. Bake 30-45 mins or until hot and bubbly.
Chateau Potatoes:
(I know I have this recipe somewhere on my blog but since I can't find it, I figured I'd post it again!!) These are super easy and by far Nathan and my favorite way to eat potatoes...a Legatt family recipe!
6-7 large potatoes (you wanna shoot for about 6-7ish cups of mashed potatoes when you're done)
1 container small curd cottage cheese
3/4 cup sour cream
1-1/2 T very finely diced onion
Peel potatoes, boil until soft, mashed them in large bowl, stir in rest of ingredients and beat with mixer until well combined. Now most of the time we just eat them right from here because they are still warm but if you are not eating immediately or they have cooled off a little, pop them in a 350 degree oven until hot.
Cucumbers & cream:
cucumbers (I usually get those super long ones wrapped in plastic at the store. They are usually more expensive but the taste makes up for it! They taste as if they were straight out of the garden!!)
a large dollup of mayo
salt and pepper
Dice the cucumber. I usually slice it the long way a few times and then rotate it and slice it again a few times, then start at one end and cut the other way so I get little squares. This is very important as they don't taste the same if they aren't cut this way...Nathan is VERY picky about this! :) Once you have your cucumber cut up, throw a little mayo in...maybe start with 2 tablespoons. You can always add more...you just want enough to make a nice dressing, nothing too over-done. And trust me on this...it WON'T taste like mayo, esp if you use the right amount. I do not like mayo, but this is the only way I prefer to eat my cucumbers! So mix in the mayo and then add some salt and pepper. I heard it once from a very seasoned cook that she added "a little bit of salt and a whole lotta pepper!" You do what you want. And this is a perfect side dish for almost anything!! Also it makes for a GREAT gravy-type thing to put on top of mashed potatoes!! Yes, you read that right! It was nothing that I had heard of before until I married nathan and he suggested I would make cucumbers and cream to go on top of the 'taters, and it is OH SO YUMMY!! (And please don't ruin this dish by adding vinegar...yuck!)
Mint Patties (for dessert, of course!):
4 oz cream cheese
1 tsp mint extract (this is 1/2 peppermint and 1/2 spearmint...SO good!)
4 c powdered sugar
1/4 c milk choco chips
1/4 c semi-sweet choco chips (if you only have milk chocolate, that's ok, just do all milk choco)
2 T butter
beat cream cheese and extract together, gradually add powdered sugar. Taste mixture, if you want stronger flavor, add more extract. Shape into balls. Size is up to you. I made some larger and some smaller, but most ended up about the size of the store bought little peppermint patties. 1/2 inch to 1 inch ball is a nice size. Place on waxed paper and flatten into patties. Cover and refrig or freeze until firm. Melt chocolate and butter on stove. Cool slightly. With back of spoon, smear some chocolate on top of patties. Cover and freeze until hard. Place in plastic bag and store in freezer.
Whew! And remember, if you have left overs, this is a meal that is SOOOOO easy to heat up the next day for a simple meal!! Nathan even took some of the meatballs to work and ate them cold for lunch...he said they were perfect!
And it seems as though a lot of my posts have been about food lately so if you're not into food as much as me..sorry! but it's pretty much because food is my life right now!....and lotsa kids...and lotsa dirt...and more dirt. But pretty soon the official "Legatt Elementary School" will be in progress so I've been busy researching and studying and looking at different options, etc so soon I'm sure I'll be posting more about that!
Thursday, May 27, 2010
Monday, May 24, 2010
inside fun.
It's been interesting around here.
Rain with some more rain makes for a lot of mud. And seeing how I no longer let my kids play in the mud (I know, what a mean mom I am!), it makes for an interesting time in the camper. Also, the kids broke our table base, leaving Ariella with having to eat up at the kitchen counter, and before we put her there, she was sitting in the recliner...which she did surprisingly well at!

Also, we ran out of vacuum bags for our central vac, so I haven't been able to vacuum going on 3 days...yeah, NOT fun! Esp since I rely on that thing several times a day! I hope they get here soon!!
So what exactly do you do with 4 rambunctious kids who can't go outside to play? You play inside! This is what they boys have been doing lately.
Building forts

Doing flips from the dining room bench onto the couch


Body surfing on pillows


This was fun until Tiernan kept sliding once his pillow stopped and he scraped his lip on the floor...ouch!
And they have also been taking paper after they color on it, wadding it up into a ball, and throwing them at each other like dodgeball but calling them "fire balls". Whatever.
I have been doing the usual, which includes going a little crazy with having them always on top of me and each other all the time! But I have tried out a few new recipes lately such as potato leek pizza and blueberry cobbler!


Saturday, May 22, 2010
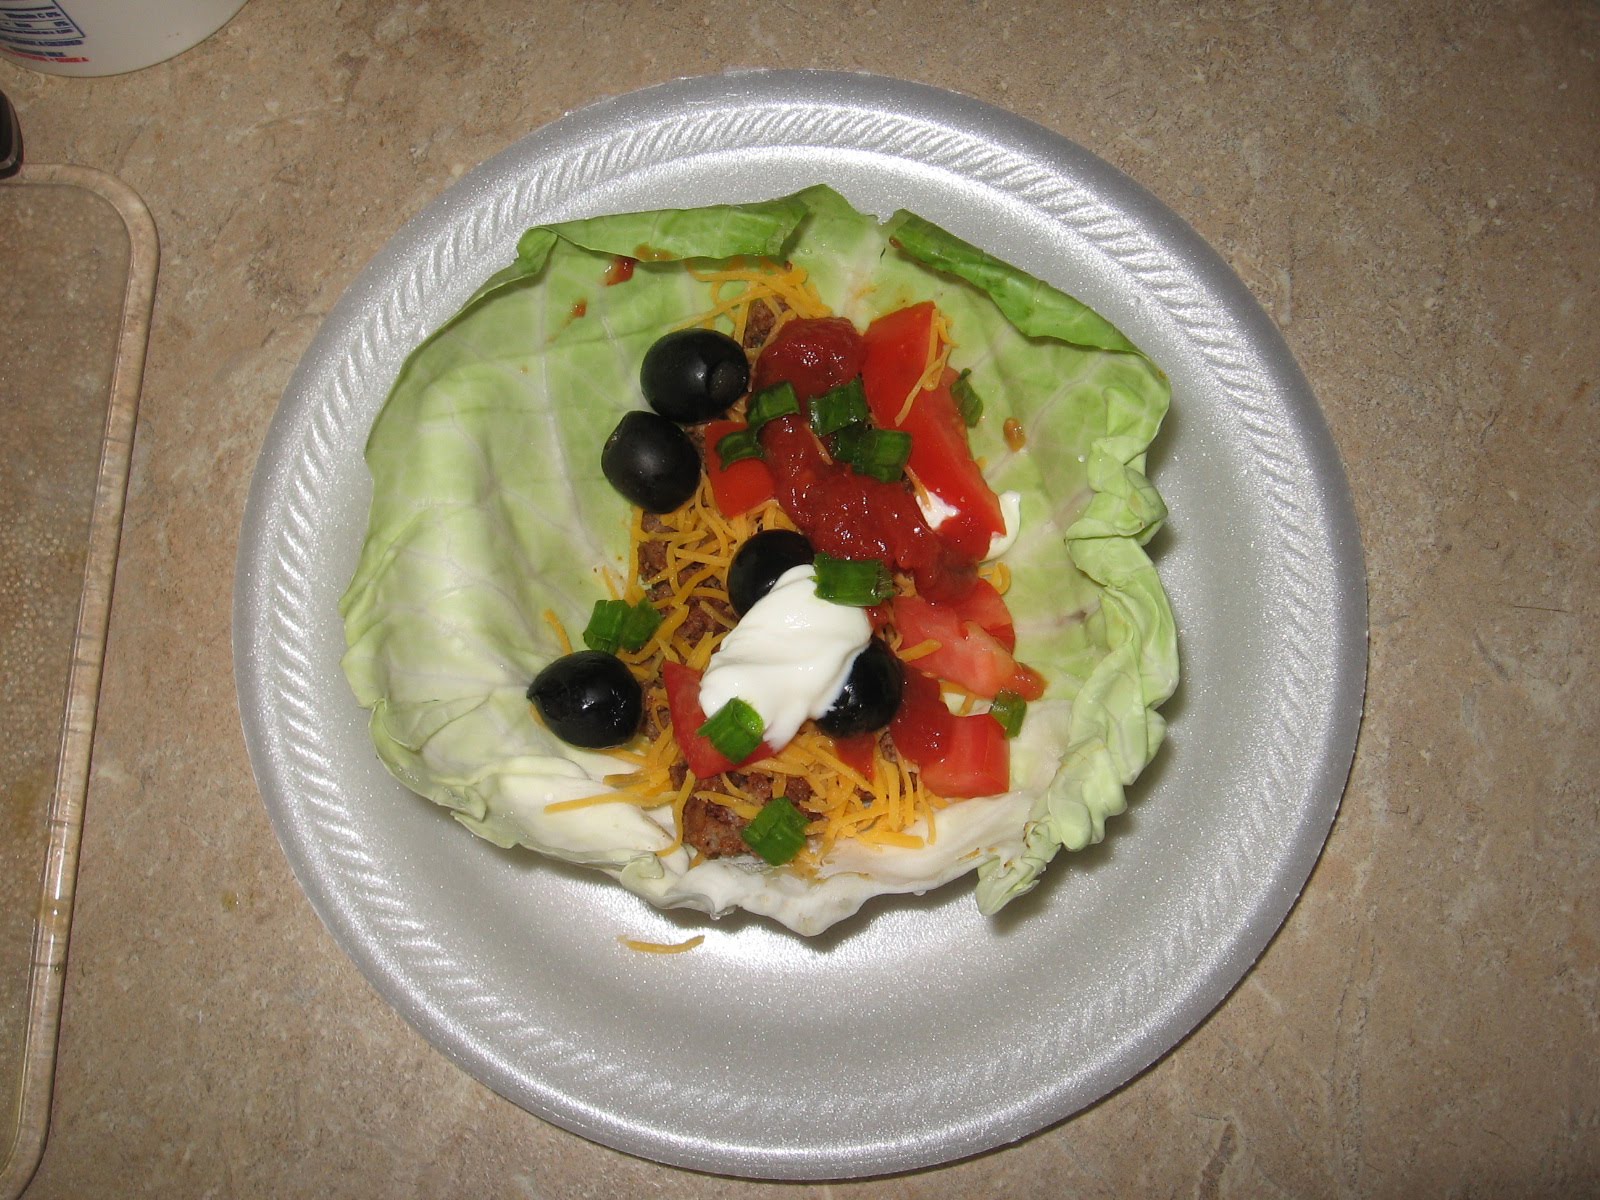
taco night.
Tonight I made tacos. Yum. That's pretty much all I hafta say! But there was something I did different tonight that I will be for surely doing again and again. I used cabbage leaves as the taco shell! You can't taste it with all the taco stuff (just in case you don't like cabbage), it gives the taco a delightful 'crunch', AND it's another way to get in your veggies!! So I would encourage you to give it a try next time you make tacos. You can wrap it around your inside goodies but yet it has a crunch...it's like a soft shell and hard shell combined!! And doesn't it just look oh, so good?!

And here is the recipe for taco seasoning that I use. Did you know that most packaged mixes at the store have MSG in them? Yes, just take a looksie at the ingredients. If you see "monosodium glutamate"...that my friends is MSG. Bad, bad, bad. Plus it will most likely have some kind of sugar or artificial sweetener which, again, is bad. And plus, this cost pennies to make!
2 T. chili powder
1-1/2 T. cumin
1 T. ground coriander
1-1/2 T paprika
1-1/2 T onion powder
1/2 t. garlic powder
1 t. salt
1/2 t. cocoa powder
1/2 t. cayenne pepper
1/4 t. celery seeds (most times I leave this out since it's the one spice out of these that i'm least likely to have...and it still turns out awesome!)
Mix all ingredient well and store in air-tight container with your spices! Sprinkle on ground beef...I usually use around 2-3 tablespoons. I just sprinkle, taste, sprinkle taste. You may do the same! Enjoy!
And on a different note....here is Ariella's new favorite place to be.

Yes, ON the table! She climbs up on the benches by herself and then climbs onto the table! I didn't think she was big enough to do that! I guess she IS 14 months old now, as of yesterday! Ah... Maybe she takes after her brothers??!

Nah...
Tuesday, May 18, 2010
stuff.
Some days are harder living in a RV with 4 kids ages 5 and under than others. I try to practice patience which is way easier said than done. Creativity is a must, especially on rainy days, which has been the case for the past 2 days here. The last time it rained i let them play in the mud since it was easier to have them outside, but that proved to give me much more work in the long run!

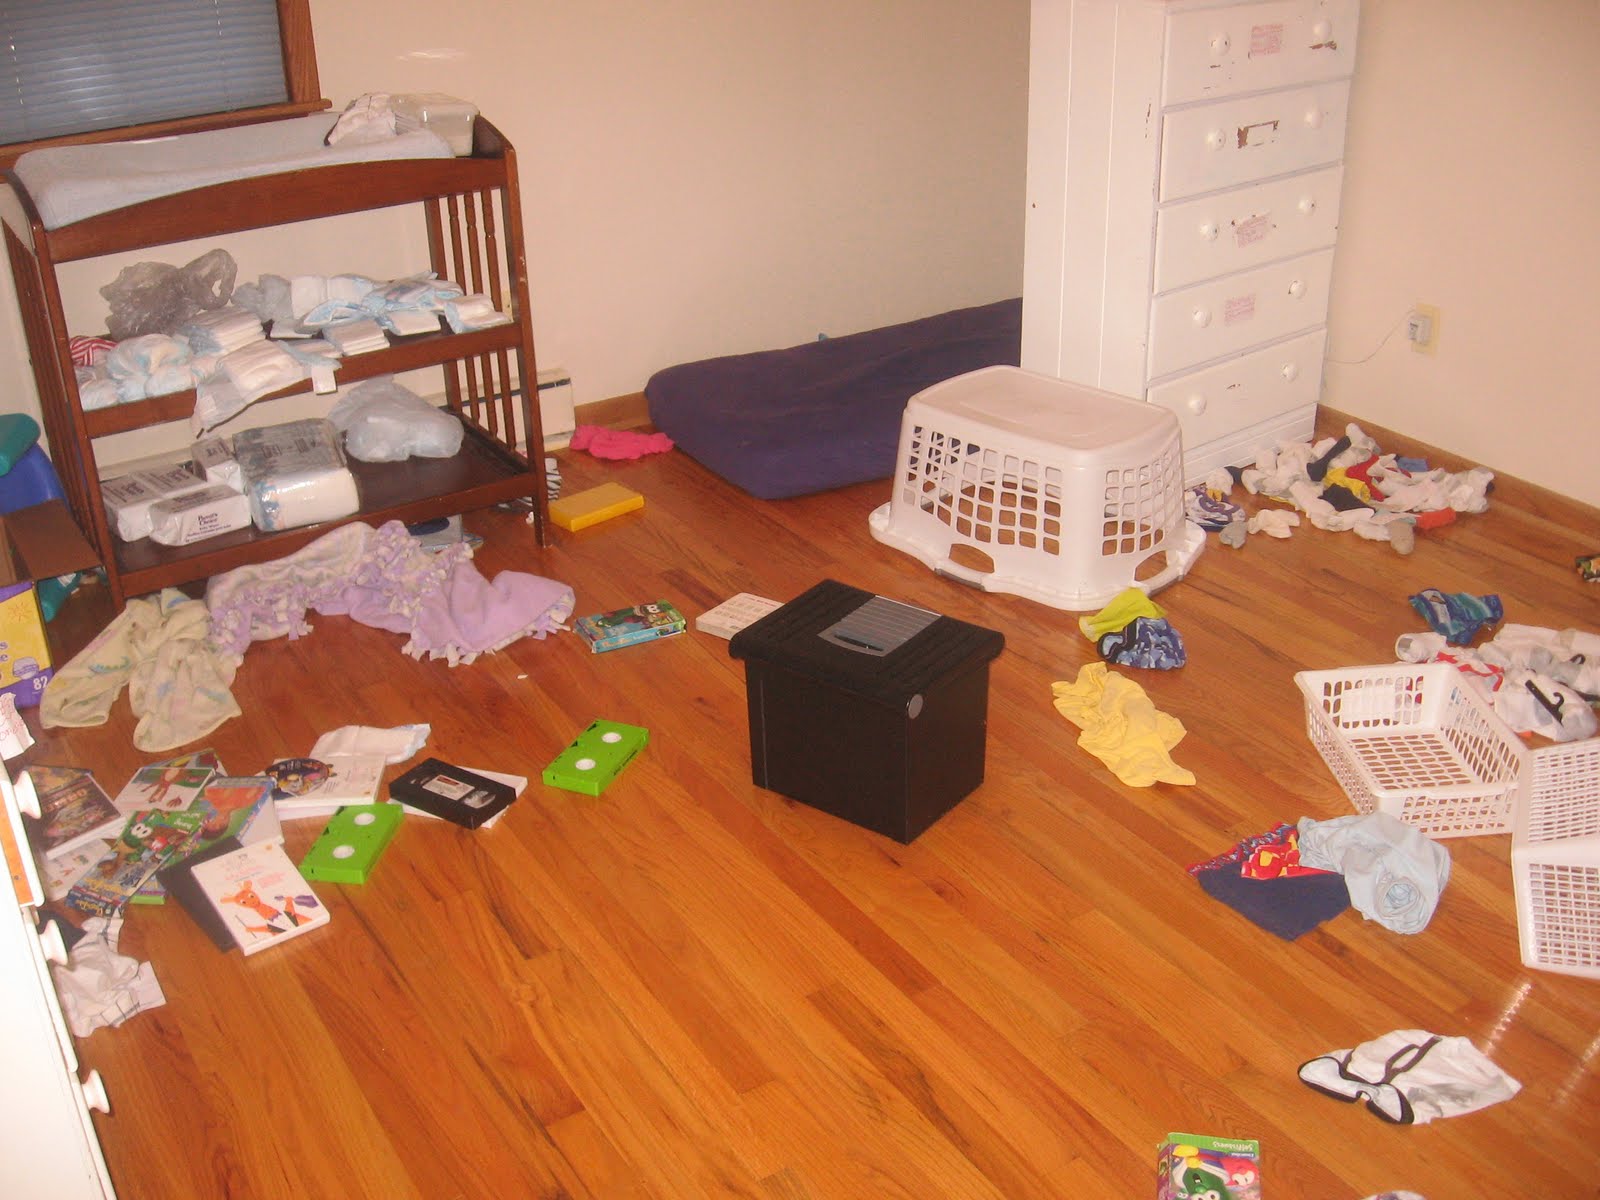
The thing i love best about living in the camper is the one thing I hate the most. Yes, it's one of those love/hate relationships. Everything must be picked up, all the time, or it looks like a tornado passed thru here and distructed everything in it's path! Remember this??

Yeah...and the one thing that Nathan always says is that it's different from a house in the fact that you need to do this before you can do that, etc. For example, you need to take the clothes baskets out of the shower before you can take a shower...but in order to have room to put the baskets in our bedroom and 'out of the way', the shoes need to be picked up (which are kept in our room) and before the shoes can be put away, the bed must be made so the compartment that the shoes are kept in isn't blocked by the blanets from the bed. So that's just ONE example. The rest of the camper works the same way. So it's a continually process!!
But I was looking back at some pics today and realized how much i LOVE not having "stuff". Yes, it would be nice to have a dishwasher or something, but all the "stuff" that we accumulated is not missed at all!! Even when we went from a house to an apt and 'thought' we got rid of a lot of "stuff" (which we did) but it was still a ton! I don't miss the messes, the moves, the boxes, the totes...ugh. It almost gives me a headache just thinking about it!


Those scenes I do NOT miss!! I will take my limited space camper over that any day!
Friday, May 14, 2010
ariella "bella"
Okay, here are those pics I was going to post earlier! Our internet still isn't working, but I'm sittin' in town with my internet card, so hopefully they'll upload with no problem!
Nathan stayed home yesterday and dealt with the kids because I was sick!! I'm not sure what it was, stomach flu or something but it wasn't fun!! Thankfully I was the only one who it affected and I am feeling much better today! And I think Nathan's very glad to go back to work today :)
And have I ever said how much I LOVE this little girl?!?!


Wednesday, May 12, 2010
bbq sauce.
Right when i was gunna do a post on the cutest little 13 mo old ever, my internet doesn't work! Argggh! Maybe its cuz of the rain? Anyway, a short post from my phone will hafta do!
Here is the recipe to the super yummy bbq sauce i made the other day.
3/4 cup ketchup
1ish T. dried minced onion
1/4 t. Garlic powder
1 t. Liquid smoke (found by bbq/steak sauce in store)
1 T. Honey
mix all together in small sauce pan and simmer for a few mins to blend flavors!
Use it as a dip, topping, whatever! What i did was put a whole chicken in the crock pot with this slathered all over it & a handful of hours later we had some delicious bbq chicken! Your whole house (camper, whatever) will smell wonderful!
Sunday, May 9, 2010
mini apple pies.
Here is a recipe that I've been meaning to post for quite some time! I actually have been thinking about it so much that I started thinking that maybe I already posted it?! I don't think I did and since I'm too lazy at the moment to go back and check my previous posts, I'll just post it! So if you've already seen this from me before, sorry...but since it's sooo good, I'm sure not too many of you will mind!
Mini Apple Pies!
Crust:
3-1/2 cups whole wheat flour
1 t. sea salt
1 cup melted butter (or coconut oil)
1 cup plain yogurt
Stir together until thoroughly mixed. Work it with your hands awhile before seperating it into about 24 pieces. Roll each piece into a little circle. Place each little circle into a well greased/buttered muffin pan. (Don't worry about it looking pretty...the taste will make up for it!)

Filing:
about 3 pounds of apples (about 12 smallish apples)
about 1/2 - 3/4 cup brown sugar (or rapadura)
1 tablespoon cinnamon
Peel apples and cut them into small chunks. Add sugar and cinnamon. Stir well and cook over med heat until apples are tender and a syrup has formed (about 10 mins)
Fill each (unbaked) crust with apple pie filling.

In bowl stir together topping ingredients:
1/2 cup whole wheat flour
1/2 cup rolled oats
2-4 T. brown sugar (or rapadura)
3 T. melted butter
Sprinkle topping all over the tops of your little pies. Bake at 375 for 20-30 mins until golden brown. Enjoy!

You can also make this up ahead of time, freeze them, and then take them out and have a very quick breakfast or dessert!
Once you have them in the muffin tins with the topping on and ready to go, place the whole thing in the freezer for a couple of hours. Remove it from the freezer and allow to sit on the counter for about 10 mins. Use a fork to gently lift them out of the pan. Place them in a ziploc bag and put them back into the freezer.
Once your ready to bake them, take them directly out of the freezer and bake at 375 for 35-40 mins! Yummy!!
Saturday, May 8, 2010
here.
So today would have been the day that Nathan left for Iowa for 7 days to attend pole climbing school to start his lineman apprenticeship before moving to themiddleofnowhere, North Dakota, but we decided that it wasn't a move we wanted to make right now. And seriously, the "town" that we would have lived near had a population of a whoppin' 14! Whew! We would have almost doubled the population! They gave us 3 hours to decide (nice long time to think about it huh?!) from the time that we received the call and orginally Nathan accepted, but then after thinking and praying about it that evening and the next morning, we decided it's not for us at this time since there would be lots of times Nathan would be living on the road away from us and that is something that we won't sacrifice. So anyway, I'm very glad we decided to stay here and continue on with our normalcy. :)
Me with my boys......
\
Another use for the camper slide.....

Me with my boys......
\

Another use for the camper slide.....

Thursday, May 6, 2010
butter 101
WOW!!!...It's been..can you guess?...yes, CRAZY around here!!
We've been visiting farms, playing in the HOT weather, having vein laser surgery, and last night discussing a move that would have happened on Saturday (yeah, in like 2 days) but we decided not to accept it. (Story about that later!)
But for now....it's makin' butter time!
So for the last...long time...years...my butter has not been consistantly turning out. Sometimes the butter would churn, sometimes not! It was soooooo frustrating!! But now, I think I found a few 'tricks of the trade' that makes makin' butter a whole lot easier!
1)Have a powerful mixer/blender. Thanks to my Gma and Gpa for sending me a VITA-MIX (awesome!) my cream goes from cream to butter in less than a MINUTE!!
2) Use cream that is a least a few days old.
3) Pour the cream off the top of the milk into a seperate jar and let sit at least overnight again to get it seperated from any milk that might have snuck into the jar too! That way you know you just have the thick cream!
Ok, so here is what I do....
1)Pour the cream into the blender and blend on high for about a minute...maybe longer if you don't have a very powerful blender. You will know when it seperates when you see yellow chunks of butter floating on top. If you use cream from the store (which I don't recommend since it's been cooked to the hilt depleting it of all essential enzymes and nutrients) it won't be as yellow, might be white depending on the cream you use.

2)Pour the contents of the blender into a strainer that has been placed over a bowl. This will leave the butter in the strainer and let the liquid (buttermilk) drain into the bowl.

3) Lift the strainer off the bowl and give the butter ball a good rinse under cold water while kneading it a little. You want to keep rinsing the butter until all of the buttermilk is gone. You know when that happens when the liquid squeezed out of the butter is clear. (See the little drops of buttermilk on the butter in the above pic? That is what we want to rinse off)
4)Get a bowl of cold water to drop the butter in to rinse it some more. Just squish the butter ball around to get it 'cleaned' from the buttermilk. (You don't HAVE to get all the buttermilk off if you will be using the butter within a couple days but if you want to store it in the freeer or have it last longer than a couple days, you'll want to rinse it...otherwise it will start to taste 'cultured'...which cultured is very good for you, in fact most people who make their own butter make cultured butter by leaving the cream out on the counter for up to 24 hours before they make butter. Some say too that it churns better if it's room temperature. I just prefer sweet cream butter!

5)Once you have your butter ball all rinsed, you can wrap it in plastic wrap and throw it in the freezer or put it on a plate or in a bowl for immediate use! If you store it in the fridge it will get rock hard so I take mine out a few minutes before I'm going to use it so it's softened. Otherwise I've heard if you mix some butter with olive oil and put it in the fridge it will stay a soft consistency! I haven't tried that yet but plan on it so I will let you know how that turns out!
6) Next, you can strain the buttermilk to get the rest of the little butter chunks out that might have slipped through the strainer.

7) Pour the buttermilk into a jar using a little funnel and use it in any recipe that calls for buttermilk or add to smoothies!! So yummy and so nutritious!
And then you have a jar of buttermilk and a nice slab of butter! Yum!

Subscribe to:
Posts (Atom)